

How To Wrap Text In A Table In Word
Peachy Table Tricks for Office 2019
Changing the management of header row text in an Discussion 2019 tabular array
In a top-heavy table in which the cells in the first row comprise text and the cells below contain numbers, consider irresolute the direction of the text in the showtime row to make the table easier to read. Irresolute text management in the get-go row is too a good way to clasp more columns into a tabular array. Consider how wide this table would be if the words in the first row were displayed horizontally. 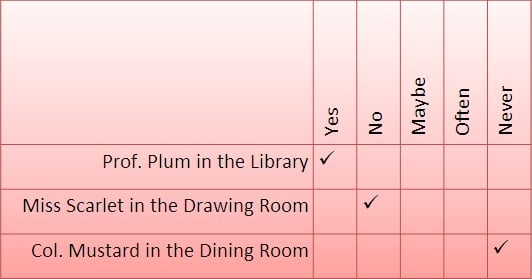 Change the direction of text to squeeze more than columns on a table.
Follow these steps to modify the direction of text on a tabular array.
- Select the row that needs a change of text management.
Usually, that's the first row in a table.
- Go to the (Tabular array Tools) Layout tab.
- Go along clicking the Text Direction push button until text lands where y'all want it to state.
You may have to click the Alignment button earlier you can meet the Text Management button.
- Change the height of the row to make the vertical text fit.
You can change the superlative of a row by going to the (Table Tools) Layout tab and entering a measurement in the Superlative box.
Wrapping text around a Word 2019 table
Nothing is sadder than a forlorn little table all alone on a page. To go along tables from being lone, yous can wrap text effectually them. 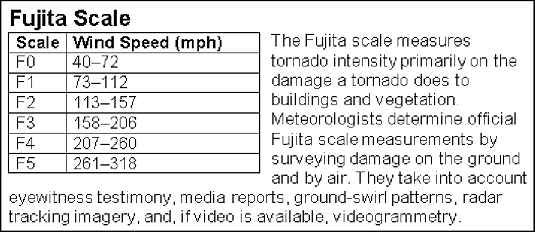 Wrap text to go on tables from being lone.
To wrap text around a table, elevate it into the text (elevate the choice handle in the upper-left corner of the table). Nine times out of ten, that'southward all there is to it, just if the text doesn't wrap correctly, follow these steps to wrap your table:
- On the (Table Tools) Layout tab, click the Cell Size group push.
The Tabular array Properties dialog box opens.
- On the Table tab, under Text Wrapping, select the Around choice.
- Click the Positioning push.
The Table Positioning dialog box appears.
- Select the Move with Text check box and click OK.
By selecting Motility with Text, you brand sure that the table stays with the surrounding text when you insert or delete text.
- Click OK in the Tabular array Properties dialog box.
Using a movie as the table background in Word 2019
As the paradigm beneath demonstrates, a moving-picture show used as the groundwork in a table looks mighty squeamish. To go far work, nonetheless, you need a graphic that serves well as the background. For the image below, this trouble was solved past recoloring the graphic. You also need to recall about font colors. Readers must exist able to read the table text, and that usually ways choosing a white or light font color for text so that the text can be read over the graphic. 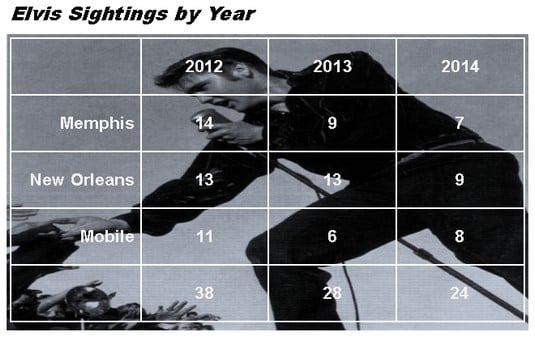 A well-chosen graphic in a tabular array groundwork helps indicate what the table is all virtually.
Placing a graphic behind a tabular array requires a fair bit of work, just the results are well worth the effort. First you insert the graphic and peradventure recolor it. Then you create the table. Lastly, yous make the table fit squarely on top of the graphic and possibly grouping the objects together.
Follow these steps to place a graphic behind a table:
- Insert the graphic, resize it, and format the graphic.
To insert a graphic, go to the Insert tab and click the Pictures or Online Pictures button. To resize it, drag a selection handle; make the graphic equally big as you desire your table to be. To recolor a graphic similar to the chore done below, select the (Film Tools) Format tab, click the Color button, and choose an option.
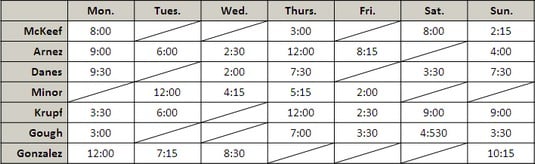 Diagonal lines mark off cells every bit different.
 - Click the Layout Options push (located to the right of the picture) and choose Behind Text on the drop-down list.
Choosing Behind Text tells Word to put the graphic backside the text. You lot tin can also go to the (Motion picture Tools) Format tab, click the Wrap Text push, and choose Behind Text.
- Insert the tabular array and brand it roughly the same size as the graphic.
To change the size of a table, elevate a selection handle on its corner or side. Place the tabular array nearby the graphic, but not correct on top of it.
- On the (Table Tools) Design tab, open the Table Styles gallery and choose Clear.
With the table styles out of the way, you lot can run into the graphic clearly through your table.
- Enter the data in the table, select a font and font color, select a border and border color, and align the text.
The easiest way to choose a font and font colour for a table is to select the table, go to the Home tab, and select a font and font size.
- Move the tabular array squarely on top of the graphic and so make the table and graphic roughly the aforementioned size.
- If the graphic is in front of the table, select the graphic, become to the (Film Tools) Format tab, open the driblet-down list on the Ship Astern button, and choose Transport Behind Text.
- To make the text in the tabular array legible, use a light-colored font. As well, use white or lite-colored table borders so that the borders can be conspicuously seen.
Cartoon diagonal lines on Discussion 2019 tables
Draw diagonal lines across table cells to abolish out those cells or otherwise make cells expect different.To depict diagonal lines beyond cells, select the cells that need diagonal lines, and on the (Tabular array Tools) Design tab, open the drop-down listing on the Borders button and choose Diagonal Downwards Edge or Diagonal Up Border.
To remove diagonal lines, open the drop-downward list on the Borders button and choose Diagonal Downwardly Border or Diagonal Upwards Border once more.
Drawing on a Discussion 2019 table
When you want to call attention to data in i part of a table, draw a circumvolve around the data. By "describe," this means make an Oval shape and identify it over the data y'all want to highlight. Hither are shorthand instructions for drawing on a Word tabular array:- On the Insert tab, click the Shapes push and select the Oval shape on the drop-downward list.
- On a corner of your page, away from the table, drag to draw the oval.
- On the (Drawing Tools) Format tab, open up the drop-downwards list on the Shape Fill push button and cull No Make full.
- Open the drop-down listing on the Shape Outline push and choose a very dark colour.
- Open up the drop-downwards list on the Shape Outline button, choose Weight, and choose a thick line.
- Elevate the oval over the data on your table that yous desire to highlight.
If the oval is obscured past the tabular array, go to the (Cartoon Tools) Format tab and click the Bring Forwards button. (Click the Arrange button, if necessary, to see this button.) While you're at it, consider rotating the oval a little way to brand information technology appear every bit though it were fatigued manually on the table.
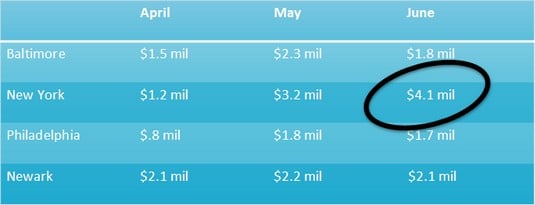 You tin can circle data to highlight it.
Using math formulas in tables in Word2019
No, you don't have to add the figures in columns and rows yourself; Discussion gladly does that for you. Word tin can perform other mathematical calculations also. Follow these steps to perform mathematical calculations and tell Word how to format sums and products:- Put the cursor in the cell that volition agree the sum or production of the cells above, below, to the right, or to the left.
- On the (Table Tools) Layout tab, click the Formula button.
Depending on the size of your screen, you may accept to click the Information button first. The Formula dialog box appears. In its wisdom, Word makes an educated guess about what you desire the formula to exercise and places a formula in the Formula box.
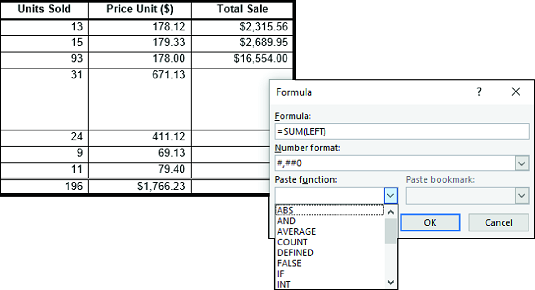 A math formula in a table.
 - If this isn't the formula you desire, delete everything except the equal sign in the Formula box, open the Paste Function drop-downward list, and choose another function for the formula.
For example, choose Product to multiply figures. You lot may have to type left, right, above, or beneath in the parentheses to tell Word where to find the figures you want to compute.
- In the Number Format drib-downward list, choose a format for your number.
- Click OK.
Word doesn't summate bare cells in formulas. Enter 0 in blank cells if you want them to be included in calculations. You tin copy functions from one prison cell to another to salvage yourself the problem of opening the Formula dialog box.
About This Commodity
This article can be constitute in the category:
- General (Microsoft) ,
Source: https://www.dummies.com/article/technology/software/microsoft-products/general-microsoft/neat-table-tricks-for-office-2019-259155/
Posted by: tannenbaumragretheable1957.blogspot.com
0 Response to "How To Wrap Text In A Table In Word"
Post a Comment